
unraid 使用 rclone 备份重要文件到 腾讯云COS
安装rclone
在官方的app商店下载插件版的rclone, 现在rclone插件可以正常安装了,如果安装出现网络问题参考下面的内容,没有问题直接跳到下一章。
Connection error - Could not reach rclone servers - Will try fallback to existing binary 问题,安装脚本里会检查‘downloads.rclone.org’的联通性,试试你的电脑能不能连接,不能的话使用代理。
我开了代理能访问‘downloads.rclone.org’但是却ping不通,不知道为什么。
安装使用的是https://github.com/Waseh/rclone-unraid/blob/master/plugin/rclone.plg这个脚本,把它下载到本地,修改里面的代码
# 源代码
ping -q -c6 downloads.rclone.org >/dev/null
if [ $? -eq 0 ]; then

# 修改为
curl -s -o /dev/null downloads.rclone.org
if [ $? -eq 0 ]; then
修改之后传到unraid上,进行安装。
COS准备
- 创建一个操作cos的子账户,记住id和key
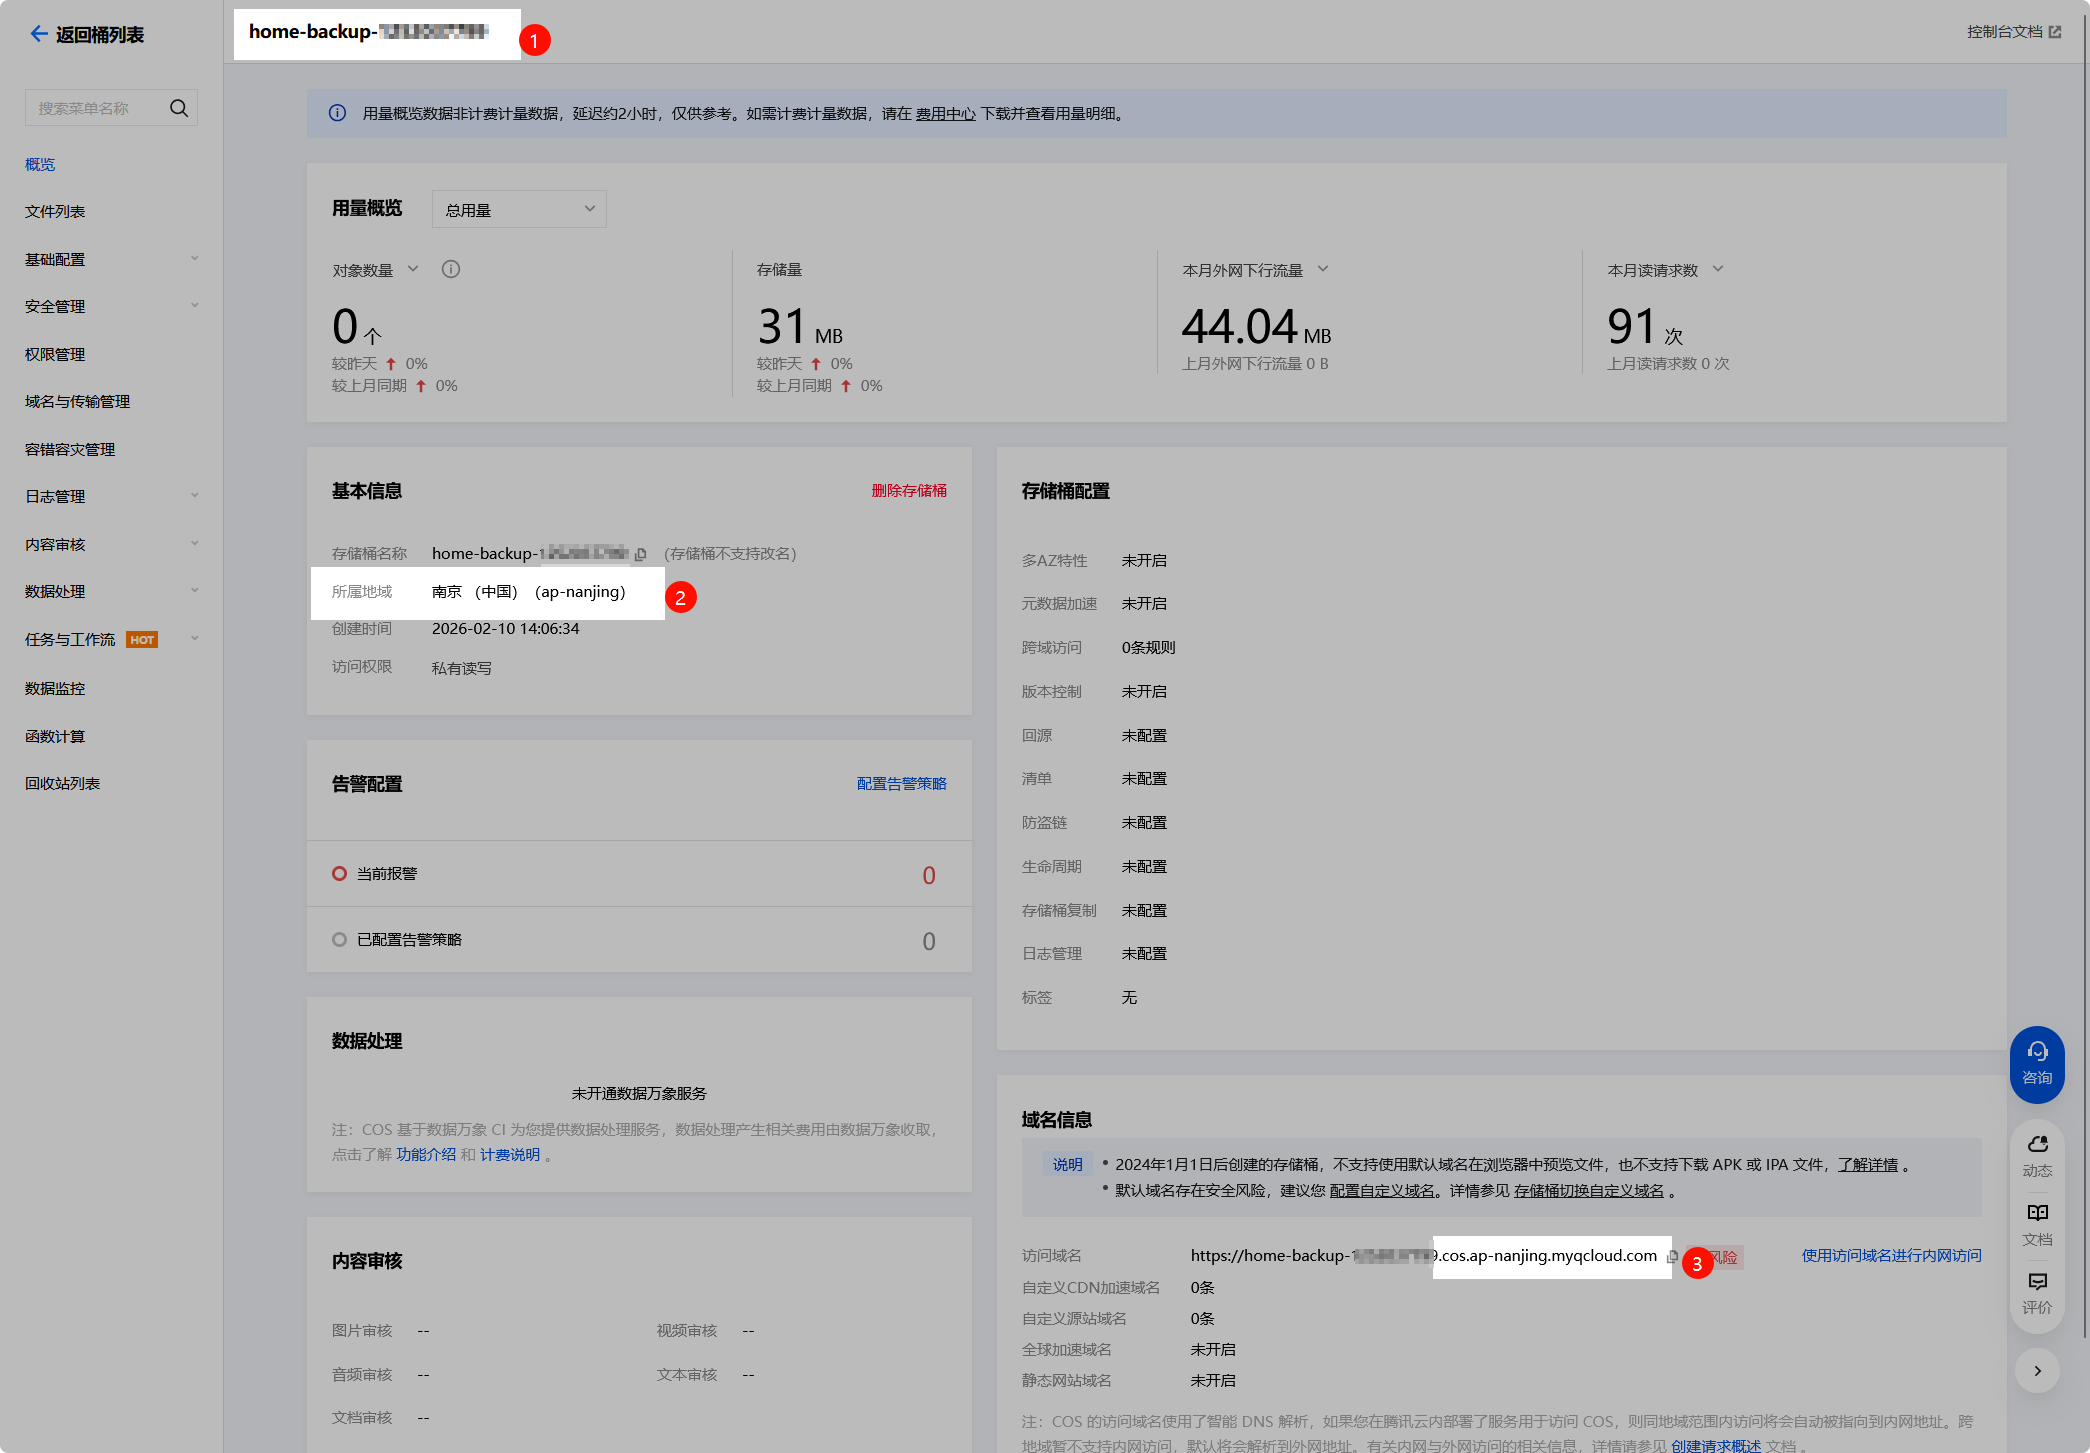
- 创建一个新的bucket,我这里叫home-backup-xxxx,记住下图的三个信息,分别是bucket名称、地域编码、接入点
- 在bucket设置里将操作权限赋给子账户
使用rclone 挂载 bucket
创建一个名为cos-backup的rclone配置,注意配置里是没有bucket信息的,挂载时才指定bucket。
root@UnRAID:~# rclone config
Current remotes:

Name                 Type
====                 ====
cos-backup           s3

e) Edit existing remote
n) New remote
d) Delete remote
r) Rename remote
c) Copy remote
s) Set configuration password
q) Quit config
e/n/d/r/c/s/q> n

Enter name for new remote.
name> cos-backup1

Option Storage.
Type of storage to configure.
Choose a number from below, or type in your own value.
 1 / 1Fichier
   \ (fichier)
 2 / Akamai NetStorage
   \ (netstorage)
 3 / Alias for an existing remote
   \ (alias)
 4 / Amazon S3 Compliant Storage Providers including AWS, Alibaba, ArvanCloud, BizflyCloud, Ceph, ChinaMobile, Cloudflare, Cubbit, DigitalOcean, Dreamhost, Exaba, FileLu, FlashBlade, GCS, Hetzner, HuaweiOBS, IBMCOS, IDrive, Intercolo, IONOS, Leviia, Liara, Linode, LyveCloud, Magalu, Mega, Minio, Netease, Outscale, OVHcloud, Petabox, Qiniu, Rabata, RackCorp, Rclone, Scaleway, SeaweedFS, Selectel, Servercore, SpectraLogic, StackPath, Storj, Synology, TencentCOS, Wasabi, Zata, Other
   \ (s3)
 5 / Backblaze B2
   \ (b2)
...
67 / seafile
   \ (seafile)
Storage> 4

Option provider.
Choose your S3 provider.
Choose a number from below, or type in your own value.
Press Enter to leave empty.
 1 / Amazon Web Services (AWS) S3
   \ (AWS)
...
44 / Tencent Cloud Object Storage (COS)
   \ (TencentCOS)
45 / Wasabi Object Storage
   \ (Wasabi)
46 / Zata (S3 compatible Gateway)
   \ (Zata)
47 / Any other S3 compatible provider
   \ (Other)
provider> 44

Option env_auth.
Get AWS credentials from runtime (environment variables or EC2/ECS meta data if no env vars).
Only applies if access_key_id and secret_access_key is blank.
Choose a number from below, or type in your own boolean value (true or false).
Press Enter for the default (false).
 1 / Enter AWS credentials in the next step.
   \ (false)
 2 / Get AWS credentials from the environment (env vars or IAM).
   \ (true)
env_auth> 1

Option access_key_id.
AWS Access Key ID.
Leave blank for anonymous access or runtime credentials.
Enter a value. Press Enter to leave empty.
access_key_id> xxx

Option secret_access_key.
AWS Secret Access Key (password).
Leave blank for anonymous access or runtime credentials.
Enter a value. Press Enter to leave empty.
secret_access_key> xxx

Option endpoint.
Endpoint for S3 API.
Required when using an S3 clone.
Choose a number from below, or type in your own value.
Press Enter to leave empty.
 1 / Beijing Region
   \ (cos.ap-beijing.myqcloud.com)
 2 / Nanjing Region
   \ (cos.ap-nanjing.myqcloud.com)
 3 / Shanghai Region
   \ (cos.ap-shanghai.myqcloud.com)
 4 / Guangzhou Region
   \ (cos.ap-guangzhou.myqcloud.com)
 5 / Chengdu Region
   \ (cos.ap-chengdu.myqcloud.com)
 6 / Chongqing Region
   \ (cos.ap-chongqing.myqcloud.com)
 7 / Hong Kong (China) Region
   \ (cos.ap-hongkong.myqcloud.com)
 8 / Singapore Region
   \ (cos.ap-singapore.myqcloud.com)
 9 / Mumbai Region
   \ (cos.ap-mumbai.myqcloud.com)
10 / Seoul Region
   \ (cos.ap-seoul.myqcloud.com)
11 / Bangkok Region
   \ (cos.ap-bangkok.myqcloud.com)
12 / Tokyo Region
   \ (cos.ap-tokyo.myqcloud.com)
13 / Silicon Valley Region
   \ (cos.na-siliconvalley.myqcloud.com)
14 / Virginia Region
   \ (cos.na-ashburn.myqcloud.com)
15 / Toronto Region
   \ (cos.na-toronto.myqcloud.com)
16 / Frankfurt Region
   \ (cos.eu-frankfurt.myqcloud.com)
17 / Moscow Region
   \ (cos.eu-moscow.myqcloud.com)
18 / Use Tencent COS Accelerate Endpoint
   \ (cos.accelerate.myqcloud.com)
endpoint> 2

Option acl.
Canned ACL used when creating buckets and storing or copying objects.
This ACL is used for creating objects and if bucket_acl isn't set, for creating buckets too.
For more info visit https://docs.aws.amazon.com/AmazonS3/latest/dev/acl-overview.html#canned-acl
Note that this ACL is applied when server-side copying objects as S3
doesn't copy the ACL from the source but rather writes a fresh one.
If the acl is an empty string then no X-Amz-Acl: header is added and
the default (private) will be used.
Choose a number from below, or type in your own value.
Press Enter to leave empty.
   / Owner gets FULL_CONTROL.
 1 | The AllUsers group gets READ access.
   \ (public-read)
   / Owner gets FULL_CONTROL.
 2 | The AllUsers group gets READ and WRITE access.
   | Granting this on a bucket is generally not recommended.
   \ (public-read-write)
   / Owner gets FULL_CONTROL.
 3 | The AuthenticatedUsers group gets READ access.
   \ (authenticated-read)
   / Object owner gets FULL_CONTROL.
 4 | Bucket owner gets READ access.
   | If you specify this canned ACL when creating a bucket, Amazon S3 ignores it.
   \ (bucket-owner-read)
   / Both the object owner and the bucket owner get FULL_CONTROL over the object.
 5 | If you specify this canned ACL when creating a bucket, Amazon S3 ignores it.
   \ (bucket-owner-full-control)
   / Owner gets Full_CONTROL.
 6 | No one else has access rights (default).
   \ (default)
acl>

Option storage_class.
The storage class to use when storing new objects in S3.
Choose a number from below, or type in your own value.
Press Enter to leave empty.
 1 / Default
   \ ()
 2 / Standard storage class
   \ (STANDARD)
 3 / Infrequent access storage mode
   \ (STANDARD_IA)
 4 / Archive storage mode
   \ (ARCHIVE)
storage_class>

Edit advanced config?
y) Yes
n) No (default)
y/n>

Configuration complete.
Options:
- type: s3
- provider: TencentCOS
- access_key_id: xxx
- secret_access_key: xxx
- endpoint: cos.ap-nanjing.myqcloud.com
Keep this "cos-backup1" remote?
y) Yes this is OK (default)
e) Edit this remote
d) Delete this remote
y/e/d> y

Current remotes:

Name                 Type
====                 ====
cos-backup           s3
cos-backup1          s3

e) Edit existing remote
n) New remote
d) Delete remote
r) Rename remote
c) Copy remote
s) Set configuration password
q) Quit config
e/n/d/r/c/s/q> q
root@UnRAID:~#
创建完成使用以下命令挂载。
# 创建挂载点
mkdir -p /mnt/cos-backup

# 挂载
rclone mount cos-backup:home-backup-xxxx /mnt/cos-backup --cache-dir /tmp/cos-cache --vfs-cache-mode writes
访问/mnt/cos-backup查看是否挂载成功,如果没问题,使用nohup后台运行,或者使用User Scripts插件配置开机启动
备份
我这里让大模型写了一个备份脚本,使用userscripts每周执行一次。
#!/bin/bash
set -e

# 提升当前脚本进程的优先级
renice -n 0 -p $$ > /dev/null 2>&1

# 配置区
BACKUP_ITEMS=(  # 需要备份的目录列表,根据实际情况修改
    "/root"
    "/mnt/user/appdata/mysql"
    "/mnt/user/appdata/gitlab-ce"
    "/mnt/user/appdata/alist"
    "/mnt/user/appdata/ghost-joy"
    "/mnt/user/appdata/ghost-ray"
    "/boot/config"
)
# 新增:需要排除的目录列表(支持通配符)
EXCLUDE_ITEMS=(
    # GitLab 监控数据(核心排除项,解决备份体积暴增)
    "/mnt/user/appdata/gitlab-ce/data/prometheus/*"
    # 可选:GitLab CI/CD 产物(如果不需要备份CI产物可开启)
    "/mnt/user/appdata/gitlab-ce/data/artifacts/*"
    # 可选:GitLab 构建日志(如果不需要备份构建日志可开启)
    "/mnt/user/appdata/gitlab-ce/data/builds/*"
    # 可选:其他临时/缓存目录(根据需要添加)
    "/mnt/user/appdata/*/tmp/*"
    "/mnt/user/appdata/*/cache/*"
    "/mnt/user/appdata/*/log/*"
    "/root/.cache/*"
)
TMP_BACKUP_DIR="/mnt/user/data/tmp"
COS_BACKUP_DIR="/mnt/cos-backup/unraid"
KEEP_BACKUPS=3  # 保留3个最新的备份文件
COMPRESS_LEVEL="9"  # xz压缩级别(1-9,数字越大压缩率越高但速度越慢,J4125建议7-9,i5建议9)
CPU_CORES="4"  # 限制xz使用的CPU核心数(根据你的CPU调整,比如J4125设2,i5设4)

# 生成备份文件名
BACKUP_DATE=$(date +%Y%m%d_%H%M%S)
BACKUP_FILENAME="${BACKUP_DATE}_backup.tar.xz"
TMP_BACKUP_FILE="${TMP_BACKUP_DIR}/${BACKUP_FILENAME}"

# 开始备份流程
echo -e "\n===== 开始 Unraid 备份流程($(date))====="

# 检查目录
check_dir() {
    if [ ! -d "$1" ]; then
        echo "创建目录 $1..."
        mkdir -p "$1" || { echo "创建目录失败!"; exit 1; }
    fi
}
check_dir "${TMP_BACKUP_DIR}"
check_dir "${COS_BACKUP_DIR}"

# 构建tar排除参数
EXCLUDE_ARGS=()
for exclude in "${EXCLUDE_ITEMS[@]}"; do
    EXCLUDE_ARGS+=("--exclude=${exclude}")
done

# xz压缩打包(新增排除参数)
echo -e "\n1. 开始xz压缩打包(级别${COMPRESS_LEVEL},CPU核心数${CPU_CORES})..."
echo "   排除的目录列表:${EXCLUDE_ITEMS[*]}"
echo "   正在打包,请稍候..."
tar -cSPf - "${EXCLUDE_ARGS[@]}" "${BACKUP_ITEMS[@]}" | nice -n 19 xz -${COMPRESS_LEVEL} -T ${CPU_CORES} > "${TMP_BACKUP_FILE}" || {
    echo "打包失败!"
    exit 1
}

# 校验备份包
echo -e "\n2. 校验备份包完整性..."
xz -t "${TMP_BACKUP_FILE}" && tar -tJf "${TMP_BACKUP_FILE}" > /dev/null 2>&1 || {
    echo "备份包损坏!删除文件..."
    rm -f "${TMP_BACKUP_FILE}"
    exit 1
}
echo "✅ 备份包完整性校验通过"

# rsync复制到COS
echo -e "\n3. 复制备份包到COS目录..."
rsync -aP --checksum "${TMP_BACKUP_FILE}" "${COS_BACKUP_DIR}/" || {
    echo "复制失败!检查COS挂载状态"
    exit 1
}

# 清理旧备份
echo -e "\n4. 清理旧备份,保留最新${KEEP_BACKUPS}个..."
ls -tp "${COS_BACKUP_DIR}"/*_backup.tar.xz | grep -v '/$' | tail -n +$((KEEP_BACKUPS + 1)) | xargs -I {} rm -f {} || true

# 输出结果
echo -e "\n===== 备份完成($(date))====="
echo "📦 本地备份包:${TMP_BACKUP_FILE}(大小:$(du -h ${TMP_BACKUP_FILE} | awk '{print $1}'))"
echo "☁️ COS备份包:${COS_BACKUP_DIR}/${BACKUP_FILENAME}"
echo "📜 当前COS保留的备份文件:"
ls -lt "${COS_BACKUP_DIR}"/*_backup.tar.xz | awk '{print $9}'
Comments ()